★ Save on shop price when you subscribe to Rifle Shooter. Pay just £4.49 per issue – 44% cheaper than buying in-store. Subscribe here ★


Asymmetric hearing loss in rifle shooting – what it is and how to prevent it
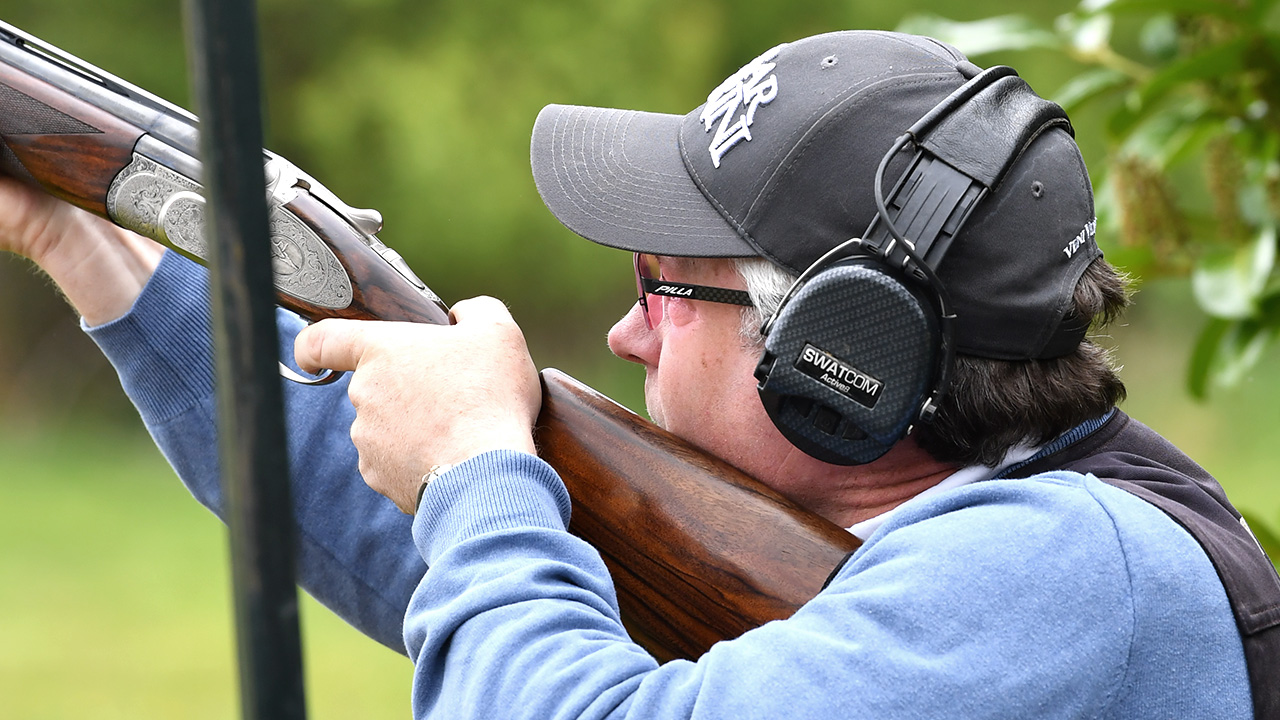
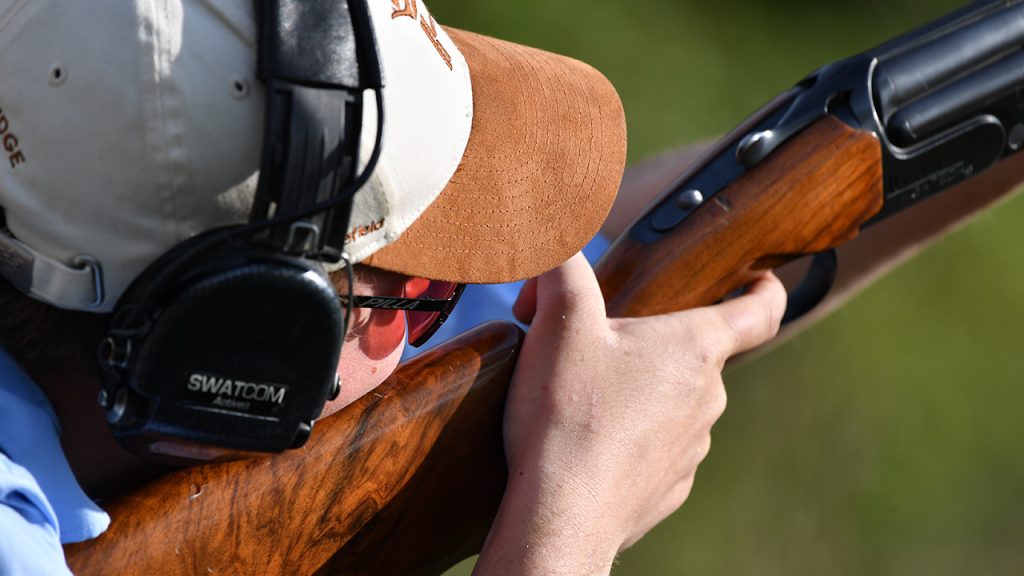
Stand beside a right‑handed shooter and watch closely at the moment the shot breaks. The cheek is welded to the stock, the right ear is tucked behind the head and nearer to the shoulder; the left ear is outboard, facing the muzzle’s blast and any nearby hard surfaces. Over a season – or a lifetime – that small asymmetry adds up.
Noise‑induced hearing loss (NIHL) from gunfire often shows up first as a notch in the higher frequencies (typically around 3–6 kHz) and represents a growing difficulty in hearing consonants, birdsong and directional cues. Among shooters, that loss is frequently worse in one ear – for right‑handed rifle users, usually the left.
Understanding why that happens, where risk spikes, and how to counter it will help you preserve hearing and field awareness without compromising accuracy.
Why the left ear gets the worst of it (for right‑handed shooters)
Three mechanics explain the pattern:
- Head and shoulder “shadow” the right ear. With a right‑handed mount, the head and shoulder act as partial barriers, reducing the direct line‑of‑sight between the muzzle and the right ear. The left ear, by contrast, is more exposed to the muzzle’s shock wave and any reflections from vehicles, walls or trees to the shooter’s left.
Studies of military and recreational shooters have long noted this left‑ear dominance in Noise Induced Hearing Loss (NIHL) among right‑handers, attributing it to shoulder‑fired posture and the acoustical “shadow” of the head. - Muzzle and ejection noise are directional. Gas vents and muzzle devices throw energy sideways and forwards; on many rifles, that places a stronger path to the off‑side ear.
- Environment magnifies asymmetry. In hides, high seats with rails, vehicles, barns or tight woodland, reflections arrive milliseconds after the direct report – often from the shooter’s left in a right‑handed stance – stacking extra energy on the already exposed ear.
A caveat: eye dominance or training can flip shoulders for some shooters, reversing which ear is more exposed. The principle stays the same – the ear with a clearer acoustic path to the muzzle and nearby reflectors takes more punishment.
“I use a suppressor. Am I safe?”
A suppressor reduces peak levels substantially, but it does not guarantee “hearing‑safe” exposure at the shooter’s ear. Government and standards body guidance converges on the same rule of thumb: avoid impulsive peaks above ~140 dB; many moderated centrefire shots still measure above 130 dB at the ear and can exceed 140 dB in some combinations of calibre, load, barrel and environment – especially around hard surfaces or under a roof.
Why asymmetric loss matters beyond an audiogram
It isn’t just about “some dB on the left.” Early, subtle damage can degrade spatial hearing—your brain’s ability to localise sound using tiny time and level differences between ears.
Even temporary threshold shifts (TTS) after a noisy day can blunt binaural cues, making wind, hoof beat or partner calls harder to place – precisely the cues a stalker relies on. Over time, that can change how you move, when you shoot and how safely you coordinate with other

Risk hotspots: where the left‑ear trap bites hardest
- Zeroing bays and covered firing points. Roofs and sidewalls bounce energy back from your left, stacking additional peaks on the left ear.
- Vehicle‑based control. Door frames, window glass and interior panels act like mirrors; firing left‑to‑right across a cab is particularly punishing for the left ear.
- Hides, barns and high seats. Any close, hard surface is a reflector; rails and posts near your left ear add reflections.
- Steel targets and rocky ground. Sharp, high‑frequency returns (the “ping” and splash) add to the total dose, again arriving on the more exposed ear.
Night work with wind. Many people subconsciously lift one earcup to hear whispered instructions – almost always the left for right‑handers. That single habit undoes your protection at the very moment you’re adding exposure.
Practical fixes that don’t cost accuracy
Think in layers: fit, geometry, discipline, and equipment choice. None of these requires changing your rifle fit or compromising cheek‑weld.
1) Fit and seal (shooting ear defenders)
- Eyewear arms can break the seal on the left cup. Choose straight, slim arms or reseat the cup firmly after you set your glasses.
- Head position changes the cup angle. With the rifle mounted, roll the left cup minutely fore‑aft to improve the seal against the cheek and jaw hinge.
- Gel cushions can maintain contact around eyewear arms better in the cold and during long sessions.
Quick seal check: with the rifle down, cup your hands over both ear defenders and lift away—there should be a noticeable pressure change; then run a fingertip round the left cup to feel for gaps.
2) Depth and stability (shooting ear plugs)
- Foam tips: roll down tightly, pull the ear up and back with the opposite hand, and hold 20–30 seconds while the foam expands.
- Flanged/filtered tips: experiment with sizes; if speech is unusually clear at arm’s length on the range, you probably need a larger tip or better insertion depth.
Electronic in‑ear: seat the plug before enabling ambient awareness. Keep wax guards and ports clear.
Ear defenders and Ear Plugs each have their own set of pros and cons. Try to find the option that suits you the best, as that’ll minimise bad habits that could contribute to adjusting or removing your hearing protection. Alternatively;
3) Double‑up when conditions demand it
If you’re shooting under cover, around vehicles, into steel, or in windy conditions that tempt you to lift a cup, run in‑ear plus over‑ear.
Independent field and occupational‑health guidance recommends double hearing protection for high‑level range work because the combined attenuation better controls those stacked reflections and action noise.
Range‑day protocol: a spotter–shooter workflow that protects hearing
- Pre‑detail brief: Confirm commands (hot/cold), hand signals and who calls wind.
- Fit check: Shooter double‑checks left‑ear seal/depth; spotter verifies visually from the left side.
- Comm discipline: Spotter stands on the shooter’s right when possible; use crisp, standard phrases so nobody is tempted to pop an earcup.
- Steel and splash: If shooting steel, double‑up and keep time on target modest.
- Breaks: Ears stay protected while anyone is downrange; remove protection only once the range is cold and guns are cleared.
This is simple, repeatable, and it makes a surprising difference to end‑of‑day fatigue and the dreaded “left‑ear ring”.
Stalking and fieldcraft: keep awareness and protection
The worry many stalkers have is losing critical sound – wind shifts, a light step on brash, partner cues. Two ideas help:
- Use electronic hearing protection intelligently. Properly fitted electronic defenders or in‑ear systems preserve ambient sound cues while clamping down on the shot itself. Set levels before the stalk and avoid fiddling when adrenaline rises.
- Work your eyes and signals more. Agree a small set of hand signals for “stop”, “back”, “wind change”, “on sticks” and “off safe”. The less you rely on whispered speech, the less temptation to uncover the left ear.
Maintenance that prevents accidental asymmetry
Mid‑season fatigue and weather wear down protection unevenly. A few small habits prevent the left cup or left plug becoming the weak link.
- Weekly check: Inspect the left cushion first – cracks or hard spots? Does it rebound like the right? If not, replace cushions as a pair.
- Tip rotation: For in‑ear, rotate fresh tips to the left side more often; that’s the ear more likely to be disturbed by wind, hood fabric or glove contact.
- Drying routine: After wet days, air‑dry cups and tips at room temperature. Don’t cook them on radiators or dashboards; heat hardens cushions and ruins tip elasticity.
Battery discipline: If you use electronic protection, open battery doors overnight after a drenching and stow with a small desiccant sachet.
A note on testing and early warning signs
If you notice ringing in the left ear after sessions, frequent “Eh?” moments in conversation, or difficulty locating the source of subtle sounds, don’t wait. A baseline hearing test, and then a repeat a year later, gives you an early warning system.
Be honest with the clinician about rifle use, moderators and environment (vehicles, barns, indoor zeroing). Early tweaks to protection habits are far easier than undoing damage.
A five‑minute “left‑ear saver” routine
Before shooting
- Glasses seated; left cup reseated afterwards.
- If using plugs, left plug inserted last so it isn’t disturbed while you settle your stock weld.
- If conditions are reflective (roof, vehicle, rails), double‑up.
During
- Spotter stands to your right when possible.
- No lifting the left earcup; use signals.
- After any long pause or conversation, reseat protection before shouldering.
After
- Wipe and dry gear; check the left cushion and left‑side tip condition first.
- Log any ringing or muffled sensation; if it recurs, escalate your protection (double‑up, fit refresh, environment changes).
To summarise
The “left‑ear trap” isn’t folklore – it’s a predictable outcome of rifle geometry, acoustics and our surroundings. Right‑handed shooters expose the left ear more directly to muzzle blast and reflections, which is why the left side so often shows earlier, greater high‑frequency loss.
Moderators help, but they don’t cancel risk at the ear – especially under cover or around vehicles. The countermeasures are simple: fit the protection properly, mind the geometry, keep discipline with comms, and escalate to double‑up via ear plugs when the situation demands.
Related Articles
Gear
Optics
New from SWAROVSKI OPTIK - dS 4-24x50 riflescope
For over 75 years, SWAROVSKI OPTIK has been setting benchmarks in premium hunting optics. Driven by the principle “by hunters, for hunters”, the Tyrolean family-owned company combines expertise, e...
By SWAROVSKI OPTIK
Gear
Product reviews
Rimfire
Anschütz 1761 Classic: Rabbiting royalty
With its compact format and crisp trigger, the Anschütz 1761 provides Bruce Potts with unmatched reliability and accuracy for some serious vermin control
By Robert Hardy
Put the phone down. Pick up the magazine.
Subscribe to Rifle Shooter
Rifle Shooter is Britain’s only dedicated rifle shooting publication – and at just £4.49 an issue, a subscription is the smartest decision you’ll make this season. That’s 44% off the newsstand price, delivered to your door before it hits the shelves.
Every bi-monthly issue is packed with rifle and optics reviews, stalking features, long-range technique and international hunting adventures. Each edition also features an exclusive interview with a guest editor from the very top of the sport – candid, first-hand insight you won’t find anywhere else.
No algorithms. No clickbait. Just exceptional rifle shooting content, crafted by people who live and breathe the sport.
Since launching in 2015, Rifle Shooter has built a loyal community of stalkers, target shooters and hunters who know that some things are worth reading properly. Join them.